
TL;DR
Moving your rig into a closet can significantly reduce noise and reflections, but effective treatment and ventilation are key. Proper placement, sealing gaps, and adding absorption makes a tiny space sound studio-ready without breaking the bank.
Ever tried recording in your closet? If so, you’ve noticed how it muffles echo and hides the noise from your busy household. But a closet isn’t automatically a perfect studio. Without some finesse, it can turn into a boomy, echoey nightmare.
This guide breaks down how to make your closet work—through smart dampening, placement, and ventilation. Whether you’re after cleaner vocals or just less noise bleeding into your recordings, these tips will help you turn a tiny space into a surprisingly effective sound haven.
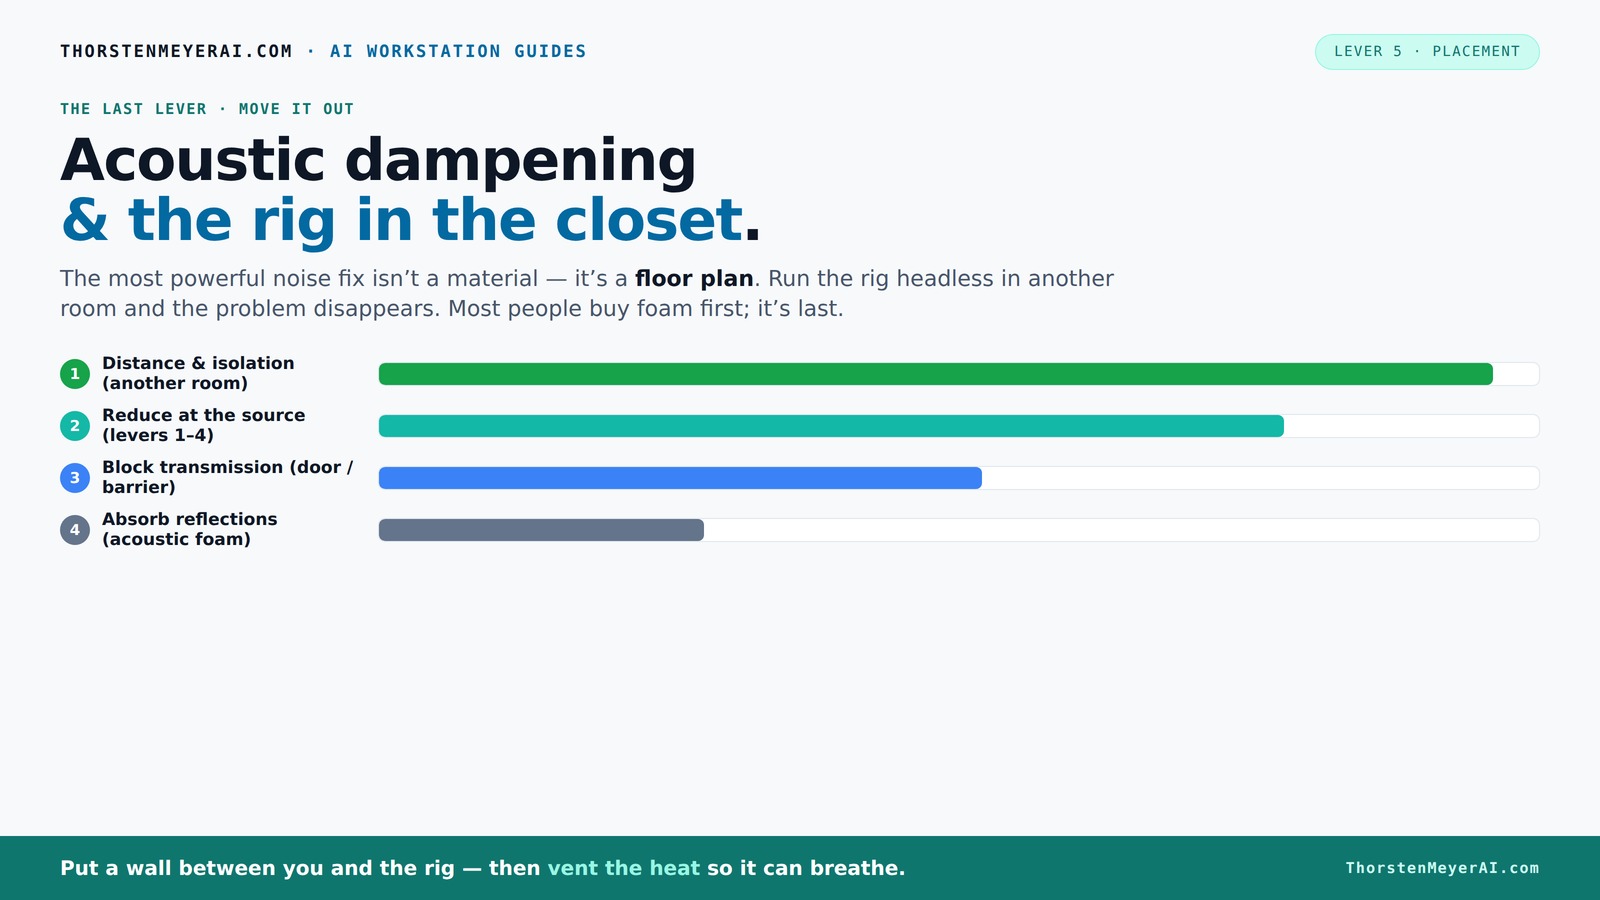
Acoustic dampening
& the rig in the closet.
The most powerful noise fix isn’t a material — it’s a floor plan. A rig you can’t hear because it’s in another room beats any amount of foam. Tap the approaches in Part 1 to see what actually works.
(another room)
(levers 1–4)
(door / barrier)
(acoustic foam)
Contain the noise, not the heat
Key Takeaways
- Moving your rig into a different room or closet cuts noise more than any foam or paneling.
- Proper ventilation is crucial; sealed closets trap heat and can damage your hardware.
- Place absorption panels at reflection points—behind the mic, side walls, and ceiling—to tame echo.
- Corners need bass traps to prevent low-frequency booms, especially in tiny spaces.
- Seal gaps around doors and vents first—air leaks are the biggest sound culprits.

Focusound 52 Pack Acoustic Foam Panels 1" x 12" x 12" Sound Proof Foam Panles Soundproofing Noise Cancelling Wedge Panels for Home Office Recoding Studio with 300PCS Double-Side Adhesive
Soundproofing - Acoustic foam panels triangular grooves structure for better noise absorption, helps to reduce and absorb unwanted...
As an affiliate, we earn on qualifying purchases.
As an affiliate, we earn on qualifying purchases.
Why Moving Your Rig Is the Biggest Win for Soundproofing
Placing your rig in another room or closet is the easiest way to cut noise. It’s like turning down the volume at the source—nothing beats distance. If your AI workstation or gaming PC lives in a closet, the noise simply won't bother you.
All you need is a solid network connection and good ventilation. This approach turns your noisy machine into a background hum, not a disruptive roar. It’s the simplest fix that doesn’t require soundproofing materials or expensive treatments.
For example, a friend of mine moved his high-performance GPU rig into a closet across the hall. Now, he talks to it over a network, and his recording space remains dead silent. Distance is the most effective sound barrier.

Audimute Soundproofing Acoustic Door Seal Kit - Door Sweep and Seal - (Large Size)
Includes (2) Door Seals (3/16" x 1/2" x 50') and (1) Door Sweep (1/2" x 1.5" x 25').
As an affiliate, we earn on qualifying purchases.
As an affiliate, we earn on qualifying purchases.
The 'Rig in the Closet' Setup: How to Ventilate Without Losing Silence
Putting a powerful, heat-generating machine in a closet is tempting but risky. Without proper airflow, heat traps quickly, and your rig throttles and screams to cool down. The key is ventilation that balances airflow and noise control.
Start with passive vents—holes with weatherstripping or acoustic sealant. For more detailed ideas, see reducing heat and noise. Then, add a quiet exhaust fan to pull hot air out. This way, heat escapes and your system stays cool without sounding like a jet engine.
For the techies: consider an active cooling solution like an AIO liquid cooler with a radiator outside the closet. It dumps heat outside, keeping your machine cool and quiet. Check out this detailed guide on [reducing heat and noise](https://thorstenmeyerai.com/reduce-heat-noise-ai-workstation/) for more ideas.

Portable Recording Booth for Home Studio, Foldable Sound Isolation Vocal Shield with Floor Stand, High-Density Acoustic Blanket Enclosure for Singing, Voiceover & Podcast, Includes Phone Holder
INSTANT STUDIO-QUALITY "DRY" SOUND: Transform any noisy room into a professional vocal booth instantly. Engineered with high-density acoustic...
As an affiliate, we earn on qualifying purchases.
As an affiliate, we earn on qualifying purchases.
Acoustic Treatment Inside a Small Space: The Real Stuff That Works
Acoustic dampening is about reducing reflections and echo. A tiny closet is full of hard, parallel surfaces that bounce sound around. The first step? Seal gaps around the door with weatherstripping or acoustic sealant—big leaks are easy to fix but often overlooked.
Next, treat the reflective surfaces. Thick, dense acoustic panels behind your mic or along the side walls cut early reflections. Bass traps in corners tame low-frequency build-up—think of them as the bass's natural 'trap' zones. These treatments matter because reflections and standing waves can cause your recordings to sound unnatural or muddy, reducing clarity and professionalism. Proper placement ensures you’re not just absorbing sound randomly but targeting the points that impact your sound quality most, leading to cleaner, more accurate recordings. You can learn more about acoustic treatment placement.
For example, a streamer lined his closet with DIY panels made from thick blankets and foam. His voice sounded warmer, less echoey, and more professional—without spending a fortune.

Ekkogo Studio Monitor Isolation Pads Premium Acoustic Foam Elevates Audio Ideal for 5 Inch Speakers Enhanced with Vibredux HD Foam for Superior Isolation
【ADVANCED VIBREDUX HD FOAM】: Experience the acoustic excellence of Vibredux HD foam with Ekkogo's Studio Monitor Isolation Pads....
As an affiliate, we earn on qualifying purchases.
As an affiliate, we earn on qualifying purchases.
Where to Place Acoustic Panels for Best Results in a Closet
Placement is everything. Start with the mirror trick: stand where you record or listen and move a mirror along the walls. Wherever you see your speakers or mic in the mirror, place absorption panels there. This ensures you're targeting the primary reflection points that cause muddiness or echo.
Important spots include:
- Behind the microphone or speaker—absorbs direct reflections that bounce straight back.
- Side wall reflection points—reduce echo and boxiness, which can distort your sound.
- Ceiling directly above the mic—controls vertical reflections that can cause phase issues.
- Corners—install bass traps to tame low-frequency boom, which tends to accumulate in these areas due to room modes.
In a small closet, strategic placement at these points can make a big difference. For tips on acoustic treatment, visit this guide on acoustic dampening. Using DIY solutions like moving blankets or foam panels allows you to customize coverage based on your specific space. Remember, covering about 20-40% of the surface area at these critical points often strikes the right balance between absorption and natural sound, avoiding over-damping which can make your recordings sound unnaturally dead.
Do You Really Need Bass Traps in a Tiny Closet?
Yes, absolutely. Small spaces tend to amplify bass frequencies because of standing waves and room resonances. Without bass traps, these low frequencies can dominate your recordings, making them sound boomy or muddy. Bass traps in corners absorb this low-end energy, preventing it from bouncing around and coloring your sound. For more on acoustic treatment, see bass trapping tips. Ignoring bass trapping often results in recordings that lack clarity and punch, especially when recording vocals or instruments that produce bass frequencies. Investing in quality bass traps can significantly improve the overall sound quality, providing a cleaner, more balanced tone. In tiny rooms, the tradeoff is clear: better sound clarity and professionalism versus a simple, inexpensive addition to your acoustic treatment.
For example, a voice-over artist installed inexpensive bass traps in his closet corners. His recordings went from muffled to clear, with tight bass and no boominess. It’s a game-changer in tiny rooms, and the added low-frequency control makes a noticeable difference in final sound quality.
Thicker, denser panels are better at absorbing lower frequencies, so investing in high-quality bass traps is well worth the cost if you aim for professional results. They help prevent the low-end buildup that can ruin a clean vocal or instrument recording, especially in confined spaces where sound waves reflect and reinforce each other.
How Much of Your Closet Should You Treat?
You don’t need to treat every inch of your closet. Instead, focus on the most critical areas—about 20-40% of the surfaces—such as walls, ceiling, and corners. For more detailed advice, check out acoustic treatment strategies. These zones are where reflections and low-frequency issues are most prominent. By targeting these points, you create an effective acoustic environment that reduces echo and standing waves without over-dampening the space, which could make it sound unnaturally dead. In small closets, covering most surfaces with DIY panels or blankets can be beneficial because sound reflects off every available surface. Using removable solutions like moving blankets or portable panels allows flexibility, so you can adjust your setup as needed. This approach balances effective acoustic treatment with practicality, ensuring your space remains functional and adaptable while improving sound quality.
For example, a streamer covered most of his closet walls with thick blankets, creating a cozy, quiet, and portable booth that improved his recordings significantly without permanent modifications.
Cheapest Ways to Get a Decent Sound in a Closet
You don’t need fancy gear to start improving your closet’s acoustics. Thick blankets, moving pads, and DIY panels made from foam or carpet can significantly reduce reflections and noise leaks. Seal gaps around the door with weatherstripping or acoustic caulk to prevent sound from escaping or entering. Adding a rug or carpet on the floor helps absorb harsh reflections and makes the space sound warmer and more controlled. Reflection filters or portable vocal booths are affordable tools that can further improve sound isolation without permanent modifications. These solutions are cost-effective because they target the core issues—reflections and leaks—rather than attempting to fully soundproof, which is often costly and complex. For budget-conscious options, check out this [affordable gear](https://www.amazon.com/dp/?tag=dreamridiculo-20) and DIY ideas that can elevate your closet's acoustic quality without breaking the bank.
Frequently Asked Questions
Can a closet really work as a vocal booth?
Absolutely. With proper treatment—sealing gaps, adding absorption panels, and controlling low-frequency buildup—a closet can transform into a surprisingly professional vocal space. It’s all about managing reflections and leaks.What is the difference between soundproofing and acoustic treatment?
Soundproofing blocks noise from leaving or entering a space, often involving mass and sealing. Acoustic treatment, on the other hand, improves how sound behaves inside the room by reducing echo and reflections, mainly through absorption and diffusion.Where should I place acoustic panels in a closet?
Place panels behind the mic or speaker, at the first reflection points on side walls, and on the ceiling above the recording spot. Corners should get bass traps to control low frequencies. Use the mirror trick to find reflection points easily.Do I need bass traps if my closet sounds boomy?
Yes. Bass traps in the corners absorb low frequencies that cause boominess. Without them, recordings often sound muddy or muddy, especially in tiny spaces with lots of reflective surfaces.How much should I treat my closet?
Treat about 20-40% of the surfaces—walls, ceiling, and corners—focusing on reflection points and low-frequency areas. Covering most surfaces helps tame echo without overdoing it, especially in very small spaces.Conclusion
Turning a closet into a recording booth is all about balance. Distance and ventilation keep your gear cool and quiet, while strategic treatment tames reflections and bass. Done right, you can get studio-quality sound in a tiny, renter-friendly space.
Don’t forget: the most effective fix is often the simplest. So, start with moving your rig, seal the gaps, and layer in absorption where it counts. Your voice, and your neighbors, will thank you.