
TL;DR

Get travel and outdoor gear delivered free with Prime
- Fast, free delivery on millions of items
- Prime Video, Amazon Music and more included
- Member-only deals all year
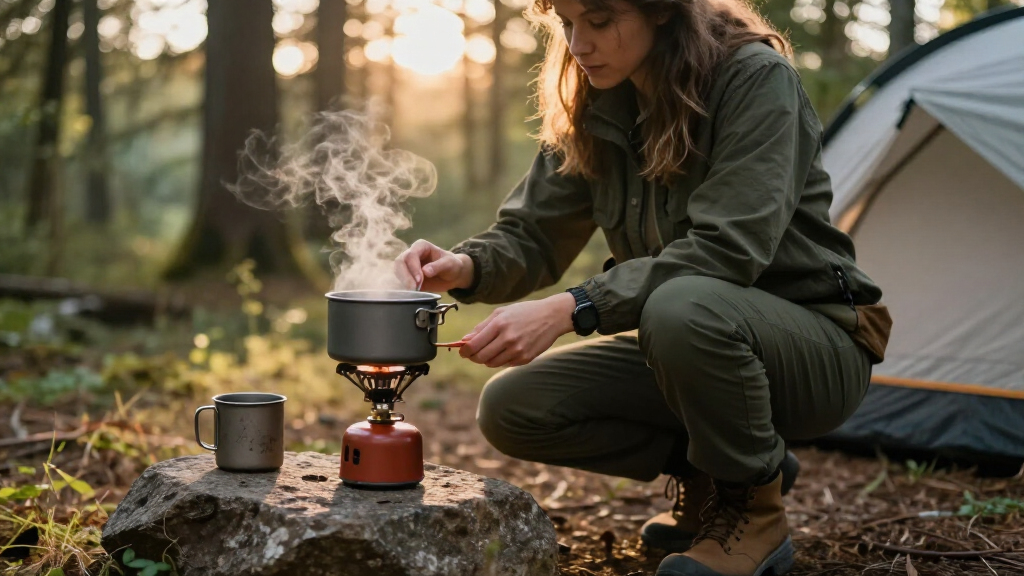
Compact camping stoves are lightweight cooking systems, commonly weighing about 100–500 grams, that let you boil water and prepare meals without carrying a full-size kitchen. Choose by matching fuel type, cooking needs, weather, and cookware to your trip; then use the stove outdoors on a stable surface and follow its manufacturer’s safety instructions.
A hot drink can feel like a small miracle when rain taps your tent and your fingers are cold—but the stove that boils it may weigh less than a full water bottle. Compact camping stoves turn a few ounces of fuel and a small burner into a practical outdoor kitchen, though the right model depends on more than weight.
This guide gives you an overview of compact stove choices, including fuel types, cooking speed, stability, and wind protection. You’ll learn how to match a stove to a weekend backpacking trip or a windy campsite, what tradeoffs to expect, and how to handle fuel safely. Check the manufacturer’s instructions and local fire rules before you head out; conditions and restrictions vary by place and season.
Compact camping stoves commonly weigh about 100–500 grams; count fuel and accessories when comparing packed weight.
Choose fuel based on trip length, weather, local availability, and fire rules—not convenience alone.
A 3–5 minute boil is a rough guide; wind, cold, elevation, and pot design change performance.
Match burner stability and flame control to your cookware and meals, especially if you plan to simmer or cook for a group.
Use stoves outdoors in open air, follow the manufacturer’s instructions, and supervise children closely around flames and hot cookware.
What a compact camping stove can—and can’t—do for you
A compact camping stove is a small, portable burner designed to cook outdoors while taking up little space in your pack. Many weigh about 100–500 grams, and a boil can take roughly 3–5 minutes in favorable conditions, making them useful for boiling water, heating simple meals, or brewing coffee. Those numbers describe the burner and an idealized task; they don’t account for fuel, a pot, a lighter, or the extra time needed to cook a real meal.
Think of one as a pocket-sized kitchen rather than a miniature home range. A fast burner can make a mug of tea before sunrise, but it may not simmer thick oatmeal gently or support a wide, heavy pan. For example, a solo hiker living on dehydrated meals can prioritize low weight and quick boils because hot water is nearly the whole cooking job. A couple cooking rice and vegetables needs room to stir, a more even flame, and a base that stays steady when the pot is partly full. Choosing for the wrong style of cooking can turn a small weight saving into repeated spills, scorched food, or longer meal prep.
These stoves are designed to be light and space-efficient, making them ideal for backpacking, hiking, and minimalist camping. That convenience comes with tradeoffs: small burners have less room for cookware, fuel must be carried or sourced, and wind can steal heat. A compact burner may also force you to cook in batches if the pot is too small for everyone’s meal. Boil-time figures are useful comparisons, not promises; cold weather, elevation, pot shape, and wind all affect the result, so a stove that looks fast on a product page may use more fuel or take longer on an exposed trail.
Before choosing, picture the actual meal, not just the product photo. If your plan is hot water for two freeze-dried dinners, a simple canister-top stove may do the job. If you want to fry pancakes for a group, cooking control and stability matter more than shaving a few grams. That distinction affects the whole setup: a wider stove may add weight, but can make a meal safer and less frustrating; a tiny burner saves space, but is most rewarding when your menu is simple and your pot matches it.
compact camping stove with wind protection
As an affiliate, we earn on qualifying purchases.
As an affiliate, we earn on qualifying purchases.
Compare fuel types before you buy a stove
Compact camping stoves use different fuels, and the right choice depends on where you travel, how long you stay, and what conditions you expect. Common options include canister gas, liquid fuel, alcohol, and wood; each balances convenience, weight, cold-weather performance, and fuel access differently. The practical question is not only which fuel burns well, but whether you can carry enough of it, use it safely in the conditions, and obtain or dispose of it responsibly.
| Fuel type | What works well | What to watch |
|---|---|---|
| Canister gas | Quick setup, easy flame control, compact packing | Cold can reduce performance; canisters may be hard to replace in remote areas |
| Liquid fuel | Useful for longer trips and some cold-weather setups | Often needs priming and more cleaning; handling takes practice |
| Alcohol | Simple, quiet, and often light for short trips | Slower cooking and less flame control on many models |
| Wood | Can reduce carried fuel when suitable dry twigs are available | Needs fuel gathering, leaves ash, and may be prohibited during fire restrictions |
For a two-night summer trip near a well-stocked trail town, a canister stove is often convenient: screw on the fuel, unfold the supports, and cook. Its easy flame adjustment is useful when you move from boiling water to gently warming food, but the convenience depends on having the right canister size and a reliable supply. For a winter route, check the stove maker’s temperature guidance and test the system before relying on it; cold can reduce canister pressure, so a fuel choice that works at a warm trailhead may disappoint on a frosty ridge. A liquid-fuel setup may be more suitable for some cold-weather trips, but the added priming and maintenance mean you should be comfortable operating it before you leave.
Fuel availability is part of the decision, not an afterthought. A wood stove can look fuel-free on paper, yet a wet forest floor may offer only damp twigs, turning a quick meal into a search for dry fuel. It also makes cooking dependent on local fire rules and can leave ash behind. Likewise, a canister may be easy to buy in town but unsuitable for air travel or restricted transport. Check local rules and transport guidance before packing fuel, and plan a reserve: running short on fuel can affect not just comfort but your ability to melt snow or prepare food on a long trip.
Match stove weight and burner power to your meals
Choose stove weight and power by asking how many people you’ll feed and whether you’ll boil water or cook a meal from scratch. A light burner suits a solo hiker with a small pot, while a wider, more stable model makes more sense when you plan to stir food or cook for several people. Think about the entire cooking system, too: a burner’s listed weight can look excellent until you add fuel, a separate windscreen, or a support base needed for your cookware.
Compact camping stoves are commonly rated in watts or BTUs, but a higher number does not automatically mean a better trip. More power can shorten a boil, yet it may burn fuel quickly and make delicate food harder to control. Imagine heating instant soup in a narrow cup: a powerful flame that spreads past the pot wastes heat, while a lower, steady flame may do the job with less fuss. For longer cooking, the ability to reduce the flame and keep it consistent can matter more than peak output, since scorching food or repeatedly relighting a burner costs time and fuel.
Try this practical selection process before you buy:
- Write down your meals. Count how often you need hot water and whether you’ll fry, simmer, or simply rehydrate food. This reveals whether fast boiling is enough or whether fine flame control will affect nearly every meal.
- Choose your pot first. Check the stove supports and recommended cookware size against the pot you already own. A mismatched pot can sit precariously or catch heat unevenly, so a small burner is not automatically the lightest solution if it requires replacing cookware.
- Estimate your group’s needs. A solo setup differs from cooking for three hungry campers after a long hike. Larger groups may need a bigger pot or multiple cooking rounds, which changes how much fuel and time you should plan for.
- Compare packed weight. Add fuel and any separate windscreen or stabilizer, not just the burner’s listed weight. A slightly heavier integrated setup can be simpler and more stable than assembling several lightweight parts.
- Test at home outdoors. Practice setup and flame adjustment with the actual pot before you rely on it in camp. A test helps you learn whether the burner simmers well and whether the pot feels secure before a meal depends on it.
A published boil time of 3–5 minutes gives you a useful starting point, not a field guarantee. A wide pot, cold water, and a breeze can stretch that time, and a longer boil means more fuel is used. If you usually make one hot drink and one dehydrated meal, a basic stove may be plenty; elaborate cooking calls for better simmer control and a steadier base. In other words, buy for the cooking you’ll actually do, not the biggest power figure or smallest advertised weight.
Stay steady and cook safely in wind and cold
Use a compact camping stove on a stable, level outdoor surface, shield it from wind without enclosing it, and keep children supervised well away from the flame and hot cookware. Wind protection can improve cooking efficiency, but a barrier that traps heat around a pressurized fuel canister can create a serious hazard. The safety tradeoff is important: blocking gusts can reduce wasted heat, but restricting airflow or heating the canister can make the stove dangerous, so use only the protection approved for your model.
Wind is a hungry thief: it carries heat away from the pot, lengthens cooking, and can snuff a small flame. Some newer stoves include integrated wind protection, while other setups use a separate shield. Follow the specific stove manual for approved wind protection and keep ventilation clear. For example, at an exposed lakeside campsite, move the burner to a sheltered outdoor spot rather than wrapping the entire stove and canister in a tight metal screen. A natural windbreak can help without enclosing the fuel system, and choosing a sheltered location may save more fuel than trying to compensate with a higher flame.
Stability matters just as much as wind resistance. Set the stove on firm ground, use a pot that fits the supports, and avoid balancing a heavy pan on a tiny burner. If the ground is soft, use a manufacturer-approved base or a firm, heat-safe platform. A small wobble can become a spill when you stir or pour, so take a moment to check the setup before lighting it. Keep fuel away from direct flame and hot surfaces, and never leave a lit stove unattended.
Never use a camping stove inside a tent, vehicle, or other enclosed space. Stoves can produce carbon monoxide, an odorless gas that can kill, and they also create fire and burn risks. Cook outdoors in open air, away from tent walls, dry grass, and hanging gear.
Children need close, attentive supervision around stoves and hot liquids; a stable burner does not prevent burns or drowning elsewhere at camp. Keep the cooking area separate from play, turn pot handles inward, and let cookware cool before packing. Check fire bans and site rules before using wood-burning models or any open flame. These precautions can feel slower than setting up wherever is convenient, but preventing a tip-over or fire is far more important than saving a few minutes at mealtime.
Keep your stove reliable with a few simple habits
A stove lasts longer and works more predictably when you inspect it before trips, clean it as the maker directs, and store fuel and parts correctly. A quick check at home can reveal a loose connection or damaged support before you discover the problem with dinner half-cooked in the dark. It also gives you a chance to replace a small part or change your plan while you still have access to supplies.
After a weekend trip, let the stove cool fully and wipe away food splashes, soot, or dust with a soft cloth. Check the burner openings and pot supports for blockage or bending, and inspect hoses, seals, and connections for visible wear. Debris can affect the flame, while a damaged support can make cookware unstable. Don’t poke parts with a tool or apply lubricant unless the manufacturer recommends it; small changes can interfere with safe operation. If you notice damage or an unusual flame, stop using the stove until you’ve checked the maker’s troubleshooting guidance or had it serviced.
Fuel systems need their own attention. Attach and detach a canister outdoors, away from flames, and follow the connection instructions for your model. Never use a canister that looks damaged, leaks, or has a faulty valve. Canisters are often designed for easy attachment and removal, and some are recyclable, but recycling rules differ; follow the label and local waste guidance rather than putting a pressurized canister straight into household recycling. Proper storage and disposal matter because a canister is still pressurized even when it seems empty.
For a realistic routine, pack the stove, pot, ignition method, and planned fuel together for a backyard test. Light it according to the manual, boil a measured cup of water, and check that the flame stays controlled. This is more useful than testing the burner alone because it checks how the pot sits and how the complete setup performs. That little rehearsal can expose missing matches, a poor pot fit, or an ignition button that needs a backup lighter—problems that are easy to fix at home and frustrating on a rainy trail.
Spot useful stove upgrades—and ignore the flashy extras
Recent stove designs add features such as foldable parts, improved igniters, multi-fuel compatibility, and integrated wind protection, but a useful upgrade is one that solves a problem you actually face. A piezo igniter can make lighting a burner easier, yet carrying backup matches or a lighter is still sensible because ignition systems can fail. The benefit is convenience, not guaranteed reliability; on a remote trip, a backup weighs little compared with the cost of losing the ability to cook.
Foldable and modular designs can pack neatly beside a pot, which helps if your backpack has limited space. Some models also use multiple fuel types, offering flexibility for travelers who visit places where one fuel is hard to find. That flexibility can bring extra setup steps, so practice switching fuels and check which fuels the exact model supports; “multi-fuel” does not mean every fuel is safe to use. More options can reduce dependence on a single supply, but only if you know how to change configurations and can obtain the approved fuel on your route.
Digital controls and battery-powered ignition may sound appealing, especially for campers who want fine heat adjustment. They also add components that can need power or care. For a straightforward weekend hike, a dependable manual control may be easier to trust than an app-linked feature you have never tested in rain. Features earn their place when they make cooking meaningfully safer or simpler; otherwise, extra complexity can create another thing to troubleshoot outdoors.
Eco-friendly claims deserve a practical look. A wood stove may reduce the fuel you carry when dry, permitted wood is available, but it can leave ash and may be unsuitable during fire restrictions. Canister stoves can offer quick, controlled cooking, though you still need a plan for spent canisters. Compare the whole routine—fuel source, emissions claims, local rules, and waste handling—rather than choosing by a green label alone. A lower carried-fuel burden is not automatically a lower-impact choice if gathering wood damages a site or violates a fire ban.
Frequently Asked Questions
What is the best compact camping stove for backpacking?
The best choice depends on your route, weather, group size, and meals. For a short summer trip built around hot drinks and dehydrated food, a light canister stove may be convenient; for colder conditions or longer travel, compare models and fuels designed for those demands. Test the stove with your pot before the trip.
How do I choose the right fuel type?
Start with the temperatures and fuel supplies you expect, then compare setup, weight, and maintenance. Canisters are convenient for many short trips, while liquid fuel may suit some longer or colder journeys; alcohol and wood have their own limits, including slower cooking or fire restrictions. Check the stove maker’s approved fuels and local rules.
Are portable camping stoves safe to use indoors?
No. Use a camping stove outdoors in open air, never in a tent, vehicle, or enclosed room. Stoves can produce odorless carbon monoxide and create fire and burn hazards even when a door or window is open.
How long does a typical fuel canister last?
There is no single reliable runtime because canister size, stove output, weather, and cooking habits vary. Wind and cold can increase fuel use, while boiling only the water you need may reduce it. Check the manufacturer’s estimates and carry a suitable reserve for your itinerary.
How can I cook with a compact stove in windy conditions?
Choose an outdoor spot sheltered from gusts, use only wind protection approved by the stove maker, and keep the canister from becoming enclosed or overheated. A built-in shield can help, but it does not remove the need for safe placement and ventilation. Never cook inside a tent to escape the wind.
Conclusion
Choose your stove around the trip you’ll take: the meals you’ll cook, the weather you’ll meet, the fuel you can obtain, and the pot you’ll carry. Test the complete setup outdoors before leaving, and follow its instructions every time.
A good compact stove turns a cold, quiet campsite into a place where steam curls above your mug. Keep the flame controlled, the cooking spot open to fresh air, and dinner simple enough to enjoy.
Halloween Picks
halloween
As an affiliate, we earn on qualifying purchases.